
It's the Simple Things
|
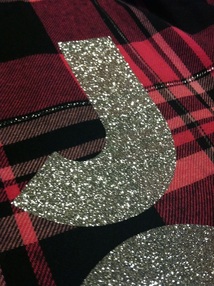
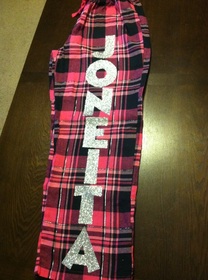
The Fantabulous Cricut Challenge Blog Design Team is taking a little break to spend the Holidays with our families. Each day, a new project, by a design team member will be posted on the blog. My project, my Christmas Jammies were posted on day 2. So head on over there for a new project each day, and some Christmas inspiration. 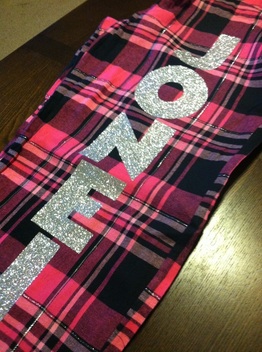 I haven't posted in a while, but I have had a great time with my family celebrating the holidays. I love spending time with my family, espically since we live 2 hours away and don't get to see them as often as we once did. While I was doing some shopping, I came across this pair of pajama pants on the clearance rack. I thought they were really cute and since they had the small stripe of silver in them, that they would make a great iron-on project. I couldn't decide what to put on it, but after thinking about it for a while, I settled on my name. I have an unusual name, thanks to the creativity of my parents and grandparents. I'm told that my name was Amanda LeAnn up until the day I was born, and my dad said that I didn't look like an Amanda to him, so they began searching and thinking of a new name. I believe that it was my grandma Betty who came up with "JoNeita." It is a combination of both of my grandmother's names - Betty Jo and Boneita. That is why I spell it with a capital "N." Most people don't know, but my first name is Evelyn, which is also my mother's name, and was my great-grandmothers name as well. So, I am proud to say that I am named after my mother, both my grandmothers, and my great-grandmother, then my maiden name was Spicer, from my dad. When I got married, I didn't drop my maiden name, like most people do, I wanted to keep it. So, I just tacked Kelly on the end, and made Spicer kind of like a second middle name. So, since there were two Evelyn's already, as I was growing up, I was always called JoNeita. My great-grandmother didn't pass away until I was in my 20's, she was just a few weeks from her 95th birthday, I hope I live that long. So, I had a different kind of name. One that most people can't spell, can't pronounce (It's Jo....Neita, with a J not a G), and that most people I meet are afraid of. I'll answer to almost any variation of the name, as I know it's hard. A lot of people call me Jo, which is fine too, and a lot easier to remember. Actually, many of the kids in our family have giving me a couple of great nicknames, because they can't say JoNeita. My cousin Alexis called me "Geita" until she was in middle school, and sometimes still does. Anyway, the reason for all this, is that because I have a creative name, I never had personalized clothes and could never find anything with my name on it. It was cool when I was in middle school to have a notebook or keychain with your name on it, but of course, it was impossible to find one with my name on it. I could find things with the name Evelyn on it, but no one knew me by that name. At my high school graduation, a guy who I had been in school with since kindergarten, asked me "Your name is Evelyn?" I guess when they only hear it once a year, the first day of school, it is easy to forget. So, I decided to put my name on this pair of pajama pants, and I love how it turned out. I used the Disney Mickey Font Cartridge and silver iron-on glitter vinyl. I cut the letters out, placed them, and ironed them on. It was super easy, and I love them.
I would love for you to become a follower of my blog, just click on the button below. Or find me on Facebook 
2 Comments
 It challenge time over at the Fantabulous Cricut Challenge Blog. This week we are challenging you to link up a holiday card. Remember you have to use at least one Cricut Cut to be eligible for the prize from our sponsor. So....I'm a couple of hours late posting this, sorry. My days are all mixed up as we have been stuck in the house since last Thursday because of an ice storm in our area. I'm going a bit crazy, it's hard to keep a 6 year old occupied, for days on end, without being able to spend much time outside. Plus, we watched Wreck it Ralph on Friday, and now he has watched it multiple times each day since. Actually, he is watching it again, for the 100th time, right now. Oh, well he likes it and it keeps him entertained for an hour at a time. So, I was super good and was able to get all my Christmas cards made during the Thanksgiving break. This is one of them, and I love how it turned out. I used the Doodlecharms cartridge to cut out the snow globe, and tore paper to create the snow banks. I recently joined the Stamps of Life "Die Hard" club and bought the "Christmas2buld" stamp set, which I love, and used for all the stamped elements on this card (the snowman, trees, snowflakes, and sentiment). Then I finished it off with some snowflake pattern paper, some pen work, and some green and white bakers twine. Oh, and I colored in the trees using a brown gelly roll pen and a green glaze pen. Materials Used: Cricut: Doodlecharms Paper: Recollections Jingle Jolly Stack and Recollections cardstock Stamps: Stamps of Life Christmas2Build set Ink: Memento Tuxedo Black ink Pens: White and Brown Gelly roll pens, Green Glaze pen Other: Foam tape (to pop up the snowman), and green and white bakers twine by Studio G Challenges Entered: Bitten by the Bug 2 Hiding in my Craft Room Paper Playtime Craftin Desert Divas It's challenge time over at the Fantabulous Cricut Challenge Blog! This week we are each challenged to create a project, using at least one Cricut cut, that has sparkle and bling. This challenge was really easy for me, as I love sparkle and bling, and think that any project benefits from a bit of shine. 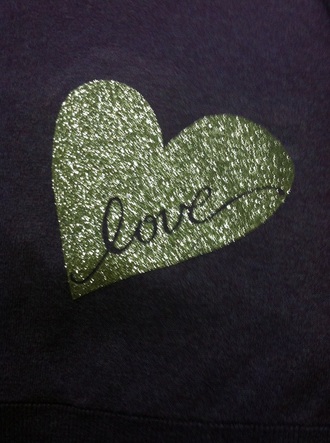
  Welcome to a Fantabulous Cricut Blog Crawl A blog crawl is our version of a Blog hop. We are opening up a DT call, please see the FCCB blog for more information. We also have a wonderful new sponsor this week: They are giving away a bag of crafty goodness to one lucky challenge participant. Be sure to visit each of the Design Team members' blogs to see their projects. If you get lost along the way, you can go back to the FCCB blog or see the list below of all of the participating blogs. When you are done with the crawl, go back to the FCCB blog and link up your project. The challenge is Anything Goes! We want to see your Cricut projects. To qualify for the weekly prize for a fabulous sponsors, you need to make sure to have at least 1 Cricut cut. Blog Crawl List: Cindy - Creating with the Heart Jackie- Luv 2 Scrap Kim - Kim's Kreations Amy HS - The Stamping Tree Emily - Mollie's Motif Heather - Scrapping Runner Creations Lynn - My Cards n Stuff Missy - Quick Chick Designs Nikki - Crafty Calamities Rebecca- Crafting Misfit Michelle- Just a Nutter Paper Crafter Caterina- Docerla Creations Joneita- Create with Joneita You Are Here LB - Cool Beans by LB Amy T - Crafting with Amy 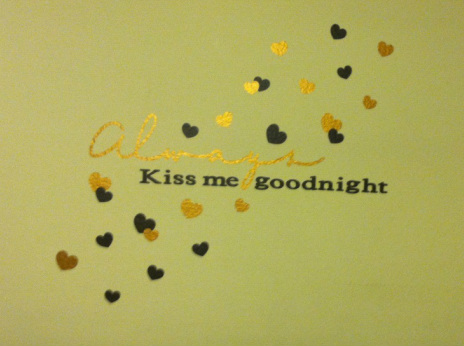 For my project, I did a vinyl wall art piece. This is just above my headboard, and I love it. I used vinyl from Cricutvinylsupplies.com, in a chocolate brown and a copper color. I love how the copper sparkles just a little bit, then the brown really grounds the piece. I have always loved this saying, and thought it would be perfect for our bedroom. I used three different cartridges for this project. I used Opposites Attract for "Always'" Plantin Schoolbook: Roly Poly font for "kiss me goodnight," and the hearts are from Create a Critter 2. I cut the hearts in 3 different sizes. I hope you like my project and that it inspires you to do some home decorating. Materials Used: Cricut: Opposites Attract, Plantin Schoolbook, & Create a Critter 2 Vinyl: www.Cricetvinylsupplies.com Challenges Entered: Die Cuttin' Divas Hiding in my craft room Cupcake Inspirations The Paper Girls Craftin' Desert Divas 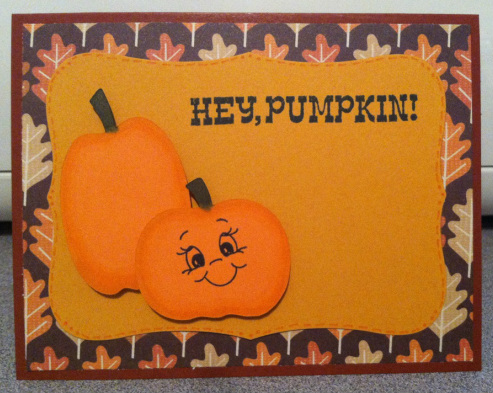 It's challenge time over at Fantabulous Cricut. This week's challenge is Signs of Fall. Using at least one Cricut cut, create a project with a Fall theme (pumpkins, leaves, harvest, etc.) I had so much fun making this super cute card. I had bought a couple of new products that I wanted to use, and had a great time testing them out. I cut out the 3 pumpkins, using Create A Critter. I stretched one to make it taller and not as wide. You can't see the 3rd pumpkin, I put it on the inside of the card in the bottom right corner. I bought the 12 sets of the Spectrum Noir alcohol ink markers. I know that they are to color in digi and stamped images, but I wondered if I could use them to add some edges to my Cricut cuts, like I usually would do with chalk. I used DG3 to color the pumpkin stems, and used GB5 and OR1, and the Blender pen to edge the pumpkins. I love out it turned out and using the blender pen on the very inside really helped the natural color of the cardstock blend with the marker color.
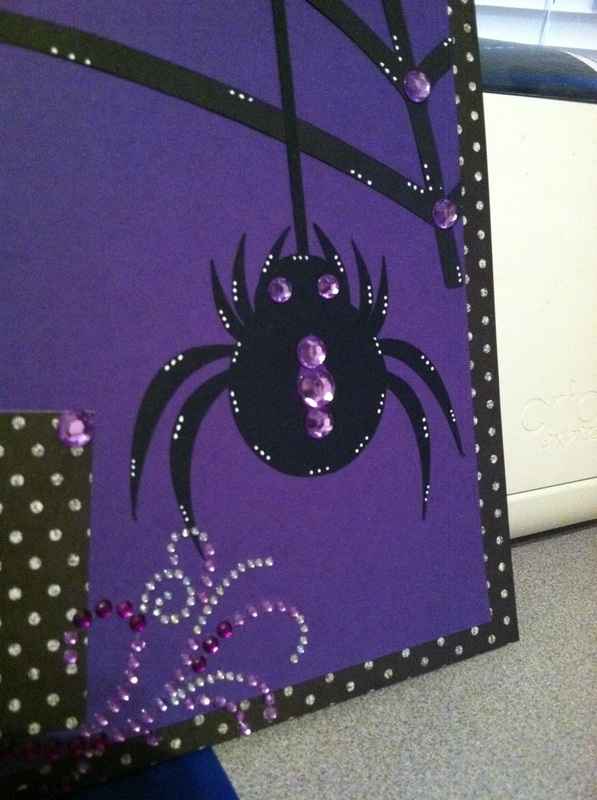
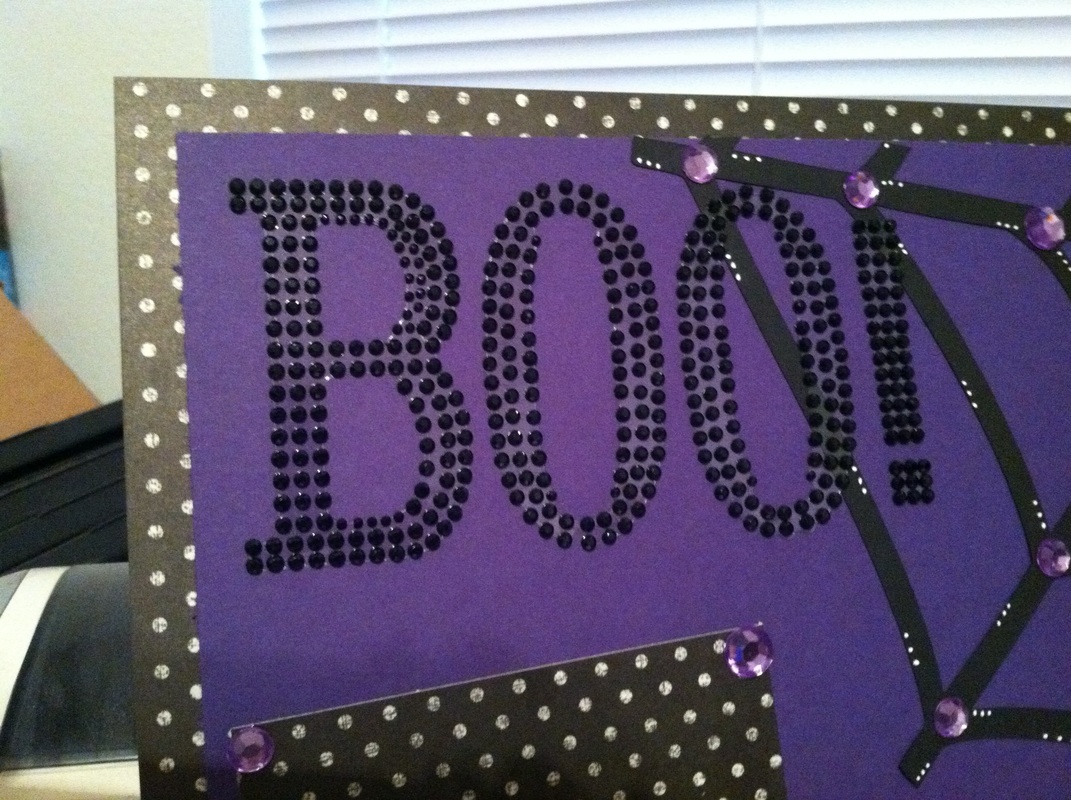
I had also bought the Labels Eight dies by Spellbinders because they were 40% off (I love a good deal). I used them to cut out the scallop base for the pumpkins. I edged it using a orange gelly roll pen. One more new product that I am so in love with is the Peachy Keen face stamp set. OMG....They are so cute and I love that you can put a little face on anything. I think it really makes this card super cute. Don't forget to link up your "Signs of Fall " Project over at the Fantabulous Cricut Challenge Blog!!! Materials Used: Cricut: Create A Critter Stamps: "Hey Pumpkin" by Recollections, "Smiley Face" by Peachy Keen Stamps Ink: Memento Tuxedo Black Ink Paper: The Paper Studio - All Seasons II and Recollections Cardstock Spectrum Noir: DG3, GB5, OR1, and Blender Pen Cuttlebug: Spellbinders - Labels Eight Other: Orange Gelly Roll pen, foam tape Challenges: Bitten by the Bug 2 Mark's Finest Papers Cut it Up Scrappy Moms Stamps Craftin Desert Divas 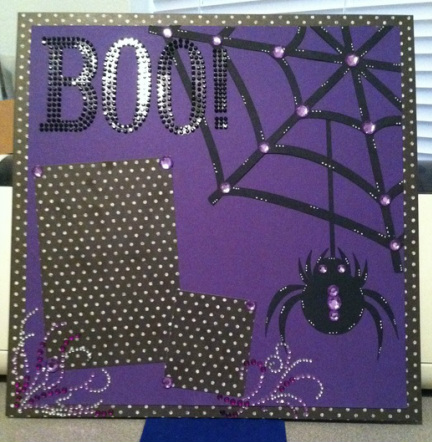 Everyone who knows me, knows that purple is my favorite color. So much, that way back, when I bought my first vehicle, that my only two desires was that it was a truck and that it was purple. I ended up buying a purple, 1995 Ford Ranger, which I loved and drove for years (until I traded it in for a "grown up" SUV". Anyway, when I found out that the challenge this week was to create a project using black and purple as the main colors, I got really excited. Don't forget to head on over to Fantabulous Cricut to link up your project, and don't forget you must use at least one Cricut cut. I had found this wonderful rhinestone "BOO!" sticker at Michaels and knew that I had to use it. I cut the spider and web using my Cricut and my Happy Hauntings cartridge, then just put everything together and dressed it up using some purple and clear rhinestone stickers, the Boo sticker, and a white gelly roll pen (I think the white dots on the spider make her look really scary). I love how this layout turned out, now if Halloween will just get here, I can add the pictures and put it in my 2013 scrapbook.
|
 
JoNeita & Dallas - Dec. 2021
About MeMy name is JoNeita Kelly and I have been crafting for at least the last 20 years. I live in Forney, Texas with my son, Dallas. I am a High School teacher and Cheerleading Coach. I love to craft and to continue to improve my photography and editing skills whenever I have free time. What I love most is telling our story using pictures, it is the most important gift I can leave my family. 
Photo by Steven Mackie Photography.
Categories
All
Archives
December 2021
Former Design Team Member for Fantabulous Cricut Challenge Blog
 |

 RSS Feed
